


Today is TECHNIQUE TUESDAY over at SHELLY'S IMAGES BLOG. I have decided to share with you one of my favorite techniques, it's called faux mosaic. For it, all you need is 2 sheets of CS, 1 sheet of DP, your trimmer, scorer, Mod Podge Glossy, ink and a dauber. Sounds pretty simple, right?

 First, I just cut and scor my CS for the base and then 2nd layer of the card.
So, once you have torn all your pieces of DP, you go through an daub the edges with your ink.

 Next, cover the second layer of card stock completely with Mod Podge.
Now it's time to start adding your daubed pieces of torn DP. You'll want to overlap them and cover the CS. You can always go over the edges of the CS because you can go back and trim off the excess after it dries. You may have to reapply the Mod Podge during the course of covering your CS because it dries quickly.  When you have finished adding all your torn pieces of DP, go over the whole thing with a thin layer of Mod Podge to make sure all of the edges are stuck down. This step is why it's important to use the Gloss variety of Mod Podge because it makes the finished product look nice and shiny and not flat.
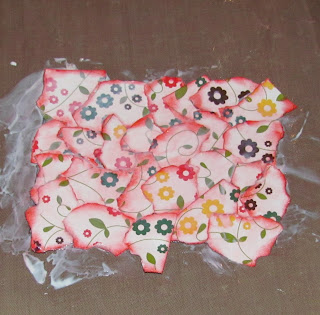
 When you have finished adding all your torn pieces of DP, go over the whole thing with a thin layer of Mod Podge to make sure all of the edges are stuck down. This step is why it's important to use the Gloss variety of Mod Podge because it makes the finished product look nice and shiny and not flat.
After it dries, then trim the edges and mount on your card base.
 Now you're ready to add your image and embellish as desired. For my image, I chose this SHELLY'S IMAGES image called Honey Bee that you can find at SHELLY'S IMAGES STORE. I colored the image with Copics and also used Stickles and Flower soft on it, then cut out using Nesties and daubed with SU taken with teal ink. Sentiment is computer generated and cut out with SU punch. Ribbon is Offray satin.
I hope you found this tutorial fun and helpful. I LOVE this technique and think the results are SOOO COOL! Please let me know what you think!:)


17 comments:
wow wow wow i didn't expect the end result to look like this it looks absolutely amazing huni xx
Thats an great idea,it looks so beautiful.
Grtzz Marjon
This is so pretty. Thanks for sharing the instructions. I will be giving this a try soon.
WOW! This looks awesome, Audrey. Thanks for the technique! It looks like it would be lots of fun. I may have to give it a try.
What a fab tutorial Audreay and what a great technique ! Thank you so much ! Hugs and smiles from Catherine
This would be a great technique to use all your scraps. Thanks for sharing the tutorial, I love how it turn out. Hope to give it a try!
Great Technique Audrey and the cards is awesome!
I love this technique Audrey! Thanks for sharing this!!!
That is a great tutorial. First time I have seen this technique. The result is really beautiful. Thank you for sharing it.
What a fab technique with a fun result, thanks so much :)
Thanks for the technique!Very interesting and beautiful :)
Maggi
What a great card base - that is awesome!
Great technique, Hip. Thanks, for sharing!
Awesome card!!! Great technique, can't wait to try it. TFS
Hugs
Bernie
your card looks amazing!!! i've seen this type of technique used a few times -- it always looks amazing!!! :) love it!
very neat idea. I love the way your card came out.
Hi Aud,
What a fab way to use up all those pieces of scrap we all end up with. At last I have found a use for my Mod Podge!!!
Hugs
Dawn xx
Post a Comment